

White Chocolate Raspberry Crepe Cake
Ingredients
Method
- In a large mixing bowl, whisk together the eggs, sugar, salt, and vanilla extract until light and frothy.
- Gradually whisk in the milk, then sift in the flour and mix until the batter is smooth.
- Stir in the vegetable oil and chilled sparkling water until fully incorporated. The batter should be thin and pourable.
- Heat a 9-inch nonstick skillet over medium heat and lightly grease with butter or oil. Pour about 1/4 cup of batter into the center, swirling to coat the bottom evenly.
- Cook until the edges lift and the bottom is light golden, about 45 seconds. Flip carefully and cook the other side for 20-30 seconds. Transfer to a plate and repeat with remaining batter. Let the crepes cool completely before assembling.
- In a small saucepan, combine the raspberries, sugar, lemon juice, and cornstarch. Cook over medium-high heat, stirring constantly, until the mixture comes to a boil and thickens, about 8-10 minutes.
- Remove from heat and press the sauce through a fine-mesh sieve to remove seeds. Let it cool completely before using.
- Place the chopped white chocolate and 1/4 cup heavy cream in a heatproof bowl. Set over a pot of barely simmering water (not touching the water) and stir until melted and smooth. Remove from heat and let cool slightly.
- In a large bowl, beat the softened cream cheese until creamy. Add the powdered sugar and vanilla extract, mixing until well combined. Fold in the melted white chocolate mixture until smooth.
- In a separate chilled bowl, whip the remaining 1 1/2 cups heavy cream until stiff peaks form. Gently fold the whipped cream into the cream cheese mixture until no streaks remain.
- Place one crepe on a serving platter or cake stand.
- Spread about 2 teaspoons of raspberry filling evenly over the crepe. Top with another crepe, then spread about 1/4 cup of the white chocolate filling over that.
- Continue layering, alternating the raspberry and white chocolate fillings, until all crepes are used (about 25-27 crepes total). Finish with a crepe on top.
- Refrigerate the assembled cake for at least 1 hour to set before serving.
- Just before serving, spread any remaining white chocolate filling over the top. Garnish with fresh raspberries, mint leaves, and a dusting of powdered sugar if desired.
- Store leftovers in the refrigerator for up to 3 days.
Nutrition
Notes
Tried this recipe?
Let us know how it was!What Is a Crepe Cake?
You’ve seen them on Instagram. Those impossibly tall, perfectly layered cakes with hundreds of paper-thin crepes stacked high. They look like they came from a fancy patisserie in Tokyo or New York. And honestly, they can be intimidating. But here’s the thing a crepe cake is just a stack of thin crepes held together with a creamy filling. That’s it. No baking required, no complicated piping, no fondant.
What makes this crepe cake recipe special is the combination of tangy raspberry filling and smooth white chocolate cream cheese filling. It’s a summer dessert that feels both elegant and approachable. The crepes are tender but sturdy enough to hold their shape. The filling stays firm even on a warm afternoon. And when you slice into it? Those clean, gorgeous layers are pure satisfaction.
I’ve been making crepe cakes for years, and I’ve learned a few things the hard way. My first attempt was a disaster sticky crepes that tore apart, filling that slid everywhere, and a cake that looked more like a leaning tower than a patisserie creation. But I kept at it, tweaking the batter ratio, the resting time, the stacking technique. Now I can make one in about 90 minutes, and it never fails to get that ‘wow’ reaction.
Why You’ll Love This White Chocolate Raspberry Crepe Cake
Real talk most crepe cake recipes online are either too complicated or too simple. They either require twenty specialty ingredients or they skip the techniques that actually matter. This one hits the sweet spot. Here’s why it works.
- No-bake dessert: Perfect for summer when you don’t want to turn on the oven. The only heat you need is a skillet for the crepes and a saucepan for the raspberry filling.
- Make-ahead friendly: You can cook the crepes a day in advance. Stack them between parchment, wrap tightly, and refrigerate. Assembly takes about 20 minutes the next day.
- Stays firm in warm weather: The white chocolate cream cheese filling is stable enough to hold its shape even at room temperature for an hour or two. No buttercream melting disasters here.
- Looks like a million bucks: Twenty-five layers of thin crepes with alternating raspberry and white chocolate filling creates a stunning visual effect. Your guests will think you spent hours on it.
The flavor balance is what really sells it though. The raspberry filling is tart and bright, cutting through the richness of the white chocolate cream cheese. Each bite has that perfect sweet-tangy contrast that keeps you coming back for more.
Ingredients for Crepe Cake

Let’s talk about what goes into this crepe cake and why each ingredient matters. I’m a firm believer that understanding the ‘why’ makes you a better baker. So here’s the breakdown.
For the crepe batter: You need eggs, sugar, salt, vanilla, whole milk, all-purpose flour, vegetable oil, and sparkling water. The sparkling water is the secret weapon here. The carbonation creates tiny bubbles in the batter that help the crepes stay light and tender. Don’t skip it. The vegetable oil keeps the crepes flexible so they don’t crack when you stack them. Whole milk gives richness without making the batter too heavy.
For the raspberry filling: Fresh or frozen raspberries work equally well. I’ve used both. Frozen berries actually break down faster during cooking, which saves a few minutes. You’ll also need sugar, lemon juice, and cornstarch. The lemon juice brightens the flavor and helps the pectin set. The cornstarch thickens the sauce to a jam-like consistency that won’t soak into your crepes.
For the white chocolate filling: White chocolate, heavy cream, cream cheese, powdered sugar, and vanilla. Use good quality white chocolate here the cheap stuff has added vegetable oils that don’t melt smoothly. I prefer Ghirardelli or Lindt. The cream cheese needs to be fully softened to room temperature before you start. Cold cream cheese will leave lumps in your filling, and nobody wants that.
How to Make Crepe Cake
This is where the magic happens. I’ll walk you through the four major stages of making this crepe cake. Each stage has its own challenges, but I’ve included visual checkpoints so you know exactly what to look for.
Stage 1: Make the crepe batter and rest it.
Start by whisking the eggs, sugar, salt, and vanilla until light and frothy. You want the sugar to start dissolving into the eggs that’s what gives the crepes their tender texture. Then gradually whisk in the milk. Sift the flour in slowly to avoid lumps. The batter should be smooth and thin, like heavy cream. Stir in the vegetable oil and the chilled sparkling water last. Here’s the crucial part: let the batter rest for at least 30 minutes at room temperature. This allows the gluten to relax and the flour to fully hydrate. If you skip this step, your crepes will be tough and rubbery. Trust the process on this one.
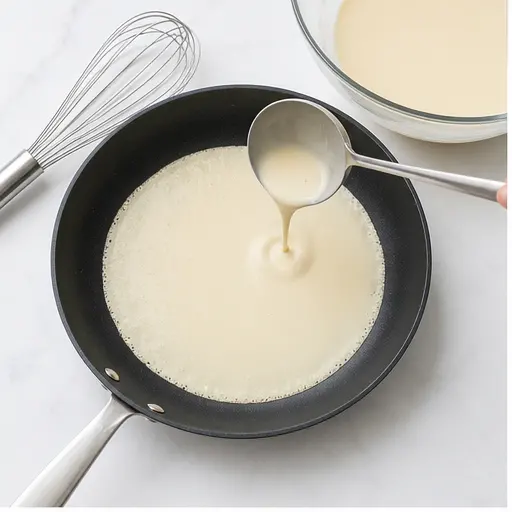
Stage 2: Cook the crepes.
Heat a 9-inch nonstick skillet over medium heat. Lightly grease it with butter or oil on a paper towel. Pour about 1/4 cup of batter into the center and immediately swirl the pan to coat the bottom evenly. You want the thinnest possible layer you should almost be able to see through it. Cook until the edges start to lift and the bottom is light golden, about 45 seconds. Flip carefully with a thin spatula and cook the other side for 20-30 seconds. Transfer to a plate. Repeat until all the batter is used. You should get about 25-27 crepes. Let them cool completely before stacking. If you stack them while warm, they’ll stick together and tear.
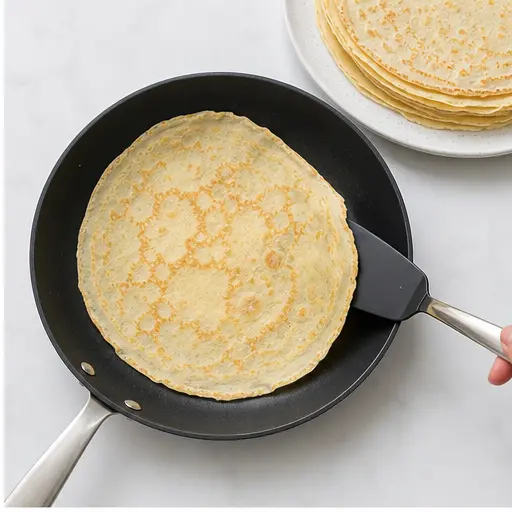
Stage 3: Make the fillings.
For the raspberry filling, combine the berries, sugar, lemon juice, and cornstarch in a small saucepan. Cook over medium-high heat, stirring constantly, until it comes to a boil and thickens, about 8-10 minutes. You’ll see it transform from a watery sauce to a glossy, jam-like consistency. Press it through a fine-mesh sieve to remove the seeds. Let it cool completely. For the white chocolate filling, melt the white chocolate with 1/4 cup heavy cream over a double boiler. Stir until smooth, then let it cool slightly. Beat the softened cream cheese until creamy, then add powdered sugar and vanilla. Fold in the melted white chocolate. In a separate bowl, whip the remaining 1 1/2 cups heavy cream to stiff peaks. Gently fold the whipped cream into the cream cheese mixture. The result should be light, fluffy, and stable.
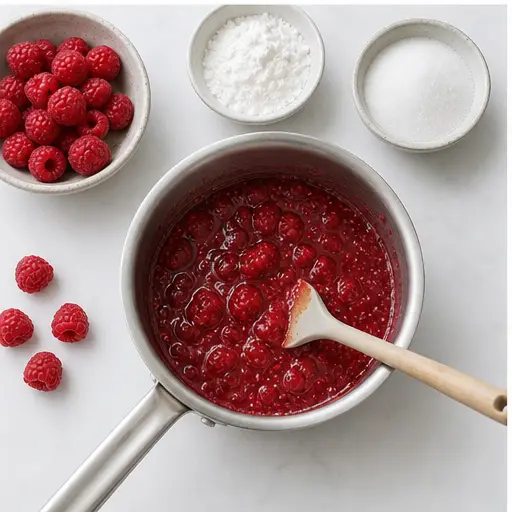
Stage 4: Assemble the crepe cake.
Place one crepe on your serving platter. Spread about 2 teaspoons of raspberry filling evenly over it. Top with another crepe, then spread about 1/4 cup of the white chocolate filling. Continue layering, alternating the fillings, until all crepes are used. Finish with a plain crepe on top. The key is to spread the fillings all the way to the edges. If you leave gaps, the cake will look uneven when sliced. Refrigerate for at least 1 hour before serving. This allows the fillings to set and the flavors to meld. Before serving, spread any remaining white chocolate filling over the top and garnish with fresh raspberries and mint.
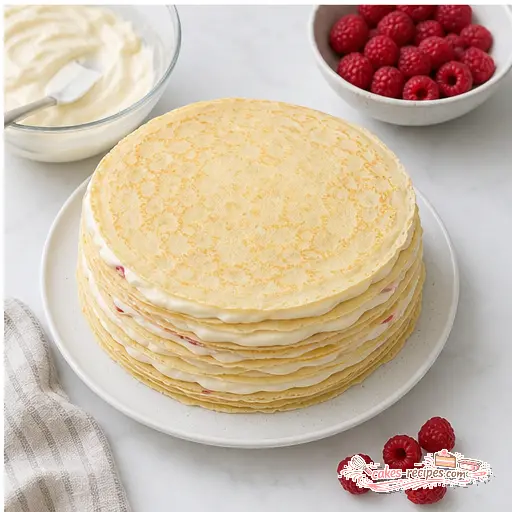
Top Tips for Perfect Crepe Cake
After making dozens of crepe cakes, I’ve collected a few tips that make the difference between a good cake and a great one. Here’s what I’ve learned.
- Use a kitchen scale. Measuring flour by volume can vary by 20-30 grams depending on how you scoop. For crepes, that difference matters. A scale ensures consistent batter thickness every time.
- Keep the pan at the right temperature. If the first crepe sticks or browns too fast, your pan is too hot. If the batter spreads slowly and the crepe turns pale, it’s too cool. Medium heat for 2-3 minutes before the first crepe usually does the trick.
- Don’t overfill. It’s tempting to add more filling, but too much will cause the cake to slide and collapse. A thin, even layer is all you need. The crepe cake should be mostly crepe, not mostly filling.
- Chill before slicing. This is non-negotiable. A warm crepe cake will squish and slide when you cut it. After 1 hour in the fridge, the fillings set and you’ll get clean, beautiful slices.
- Use a sharp knife. A dull knife will drag through the layers and smear the fillings. Wipe the blade clean between cuts for the best presentation.
Troubleshooting Before You Start
❌ Mistake: Crepes are too thick.
✅ Solution: Your batter might be too thick. Add a tablespoon of water at a time until it flows like heavy cream. Also check that your pan is hot enough a cold pan won’t spread the batter thinly.
❌ Mistake: Crepes tear when flipping.
✅ Solution: They need to cook a bit longer on the first side. Wait until the edges are visibly lifting and the bottom is golden before flipping. Also, make sure your spatula is thin and flexible.
❌ Mistake: Filling is too runny.
✅ Solution: The raspberry filling needs to be cooked until it’s thick like jam. If it’s still watery after 10 minutes, continue simmering. For the white chocolate filling, make sure the whipped cream is at stiff peaks before folding in.
Variations to Try
Once you’ve mastered this crepe cake recipe, the possibilities are endless. Here are a few variations I’ve tested and loved.
- Chocolate crepe cake: Replace 1/4 cup of the flour with cocoa powder in the crepe batter. Use a chocolate ganache filling instead of white chocolate. Add sliced strawberries between layers for a classic combination.
- Matcha crepe cake: Add 2 tablespoons of matcha powder to the crepe batter. Use a vanilla whipped cream filling and layer with sweetened red bean paste or fresh strawberries. This is a popular Japanese-style variation.
- Lemon blueberry crepe cake: Add lemon zest to the crepe batter and the filling. Replace the raspberry filling with a blueberry compote. The lemon and blueberry pair beautifully with the white chocolate cream cheese.
- Red, white, and blue crepe cake: Perfect for the Fourth of July. Layer the crepe cake with raspberry filling and blueberry filling, alternating with the white chocolate cream cheese. Top with fresh berries and a dusting of powdered sugar.
Each variation changes the flavor profile completely, but the technique stays the same. That’s the beauty of this crepe cake format once you have the base down, you can adapt it to any season or celebration.
Storing and Reheating Tips

This crepe cake keeps beautifully, which makes it perfect for make-ahead entertaining. Here’s how to store it and serve it at its best.
Refrigeration: Store the assembled crepe cake in an airtight container in the refrigerator for up to 3 days. If you don’t have a container tall enough, wrap it loosely with plastic wrap, making sure the wrap doesn’t touch the top of the cake. The crepes will absorb moisture from the filling over time, so the texture will become softer. It’s still delicious, just different from day one.
Freezing: You can freeze this crepe cake for up to 1 month. Place it in the freezer unwrapped for 1 hour until the surface is firm, then wrap tightly in plastic wrap and foil. Thaw overnight in the refrigerator before serving. The texture will be slightly softer after freezing, but the flavor remains excellent.
Serving: Remove the crepe cake from the refrigerator about 30 minutes before serving. This takes the chill off and allows the flavors to open up. Slice with a sharp knife, wiping the blade clean between cuts. Garnish with fresh berries and a dusting of powdered sugar just before serving for the best presentation.
Make-ahead strategy: Cook the crepes up to 2 days in advance. Stack them between sheets of parchment paper, wrap tightly in plastic wrap, and refrigerate. Make the raspberry filling up to 3 days ahead and refrigerate. The white chocolate filling should be made fresh on the day of assembly it doesn’t hold up as well overnight. On the day of serving, assemble the cake in about 20 minutes, chill for 1 hour, and you’re ready to go.
Frequently Asked Questions
I hope this crepe cake recipe becomes a favorite in your kitchen. It’s one of those desserts that looks impossibly impressive but is totally doable with a little patience and the right technique. If you make it, I’d love to hear how it turned out. Tag me on Pinterest or leave a comment below I read every one.
For more inspiration and to see what I’m working on next, follow me on Pinterest. I’m always sharing new recipes, tips, and behind-the-scenes looks at what’s happening in my Portland kitchen.
Source: Nutritional Information